Say you have a nice collection of media on your PC in one room, but you’d like to be able to view it on your nice big TV in another room. Windows offers a simple way to do that over Wi-Fi.
There’s actually an open standard for sharing media files across a home network. It’s called the Digital Living Network Alliance (DLNA), and you probably already have everything you need to use it. There’s also a second, and newer, standard called Miracast that will be of particular note to Windows 10 users.
First, some definitions for DLNA: The device that sends the stream—such as a PC—is the DLNA server. The device that receives the stream—such as an HDTV or something connected to the TV—is the DLNA renderer (I really hate that term; player or receiver would be much friendlier). Both devices must be on the same network.
- Setting up a DLNA server on Windows
- Windows 10, Miracast, and DLNA
- Set up DLNA-compatible media players
Setting up a DLNA server on Windows
Assuming that your PC is running Windows 7 or higher, it can serve your media without additional software. Windows Media Player (WMP) is, among other things, a DLNA server, but you have to enable it first.
 Ian Paul/IDG
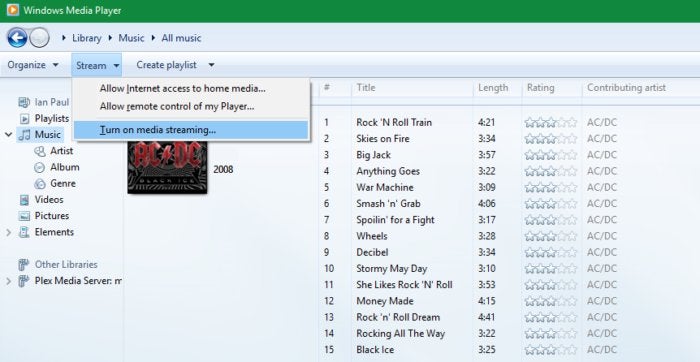
In WMP 12, select Stream > Turn on media streaming from the menu bar at the top.
Ian Paul/IDG
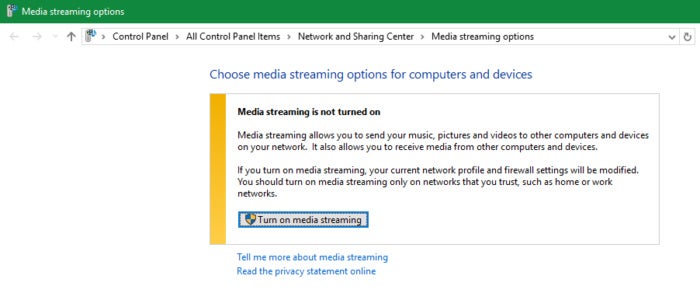
In Windows 10, you’ll now see a permissions dialog box. Click Turn on media streaming one more time.
Ian Paul/IDG
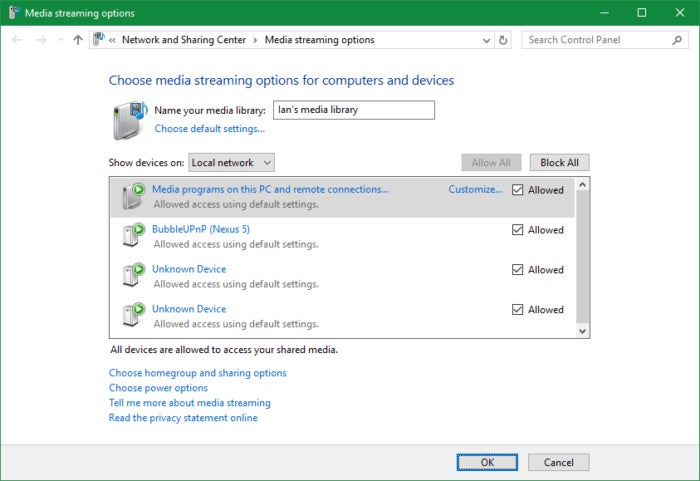
This brings you to another dialog box that allows you to control which devices on the network can receive the stream.
Don’t worry about this box at the moment. Just click OK at the bottom, but you may want to return to it at another time.
You can also find DLNA servers for other operating systems, including Android, iOS, Mac OS X, and Linux. Consumer network-attached storage (NAS) systems almost always contain DLNA server software as well.
Windows 10, Miracast, and DLNA
If you have a Windows 10 PC there’s an extra feature you can try. The above process with Windows Media Player will still work, but Microsoft has also built streaming, or casting, right into the operating system via DLNA and Miracast.
Casting has been present in Windows since version 8.1; however, we’re only going to cover Windows 10 here. Using this feature is pretty straightforward as long as you have a DLNA- or Miracast-compatible device.
Ian Paul/IDG
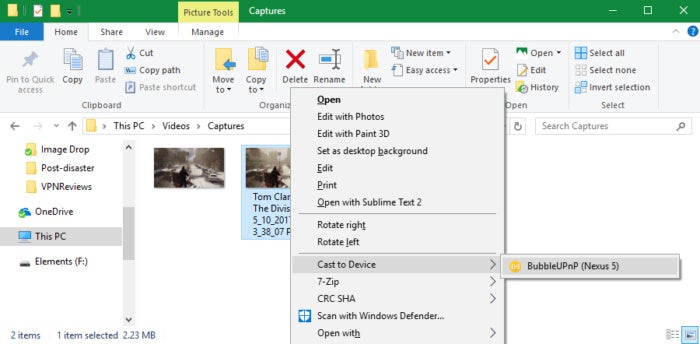
If you’ve ever used a Chromecast, then the process of casting from Windows 10 will be familiar. Right-click on a video or other piece of media on your PC. From the right-click context menu select Cast to Device. You’ll then see the devices on your local network that you can cast to. Pick one and you’re done.
Ian Paul/IDG
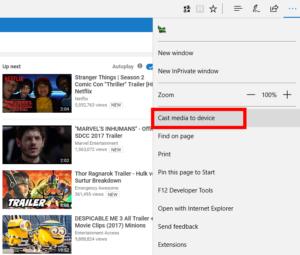
Things work similarly in Microsoft Edge. Open the browser, select the webpage you want to cast such as a YouTube video. Then in the upper-right corner select the More optionsmenu (the three horizontal dots) and select Cast media to device. After that a Windows 8-style side panel will appear on the right with available devices.
Set up DLNA-compatible media players
The vast majority of network-capable HDTVs, Blu-ray players, and game consoles can render DLNA.
Check your device’s home screen for music, pictures, and video options. When you select one of these, you’ll likely get a list of DLNA servers currently running on the home network. From here, you simply select the media file you want to stream. If you don’t see any DLNA servers, check the device manual for DLNA support.
Ian Paul/IDG
Alternately, with the right apps, you can turn a Chromecast or a Roku into a DLNA renderer.
If you have a Chromecast and an Android phone, download the free Android app BubbleUPnP. The app’s setup wizard will recommend installing its own server on your PC, but you don’t have to. That said, the app doesn’t play well with Windows Media Player so you may have no choice.
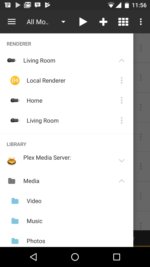
Next, open the menu on the left under the “hamburger” menu icon, and under Renderer select the device that will receive the content.
Then under Library select the DLNA server that has the media you want, and choose your content. In my case, I can choose from my PC’s hard drive, as well as my Plex Media Server.
Your content should now start playing on your TV via the Chromecast. Note that while MP4 files should work without a hitch, sometimes MKV files may not play nicely even with BubbleUPnP’s server installed on your PC.
Things are much simpler with a Roku. Just download the Roku Media Player channel, and you’ll have clear and simple access to the media on your PC.
That’s how you stream content from your PC to your TV the standard way. To learn about other methods for getting content on your TV, see TechHive’s Cord-Cutter Confidential column.
Also check out TechHive’s best streaming devices hub for buying information about the Apple TV, Roku, and other devices for watching locally storied content on your TV, as well as online streaming services.


